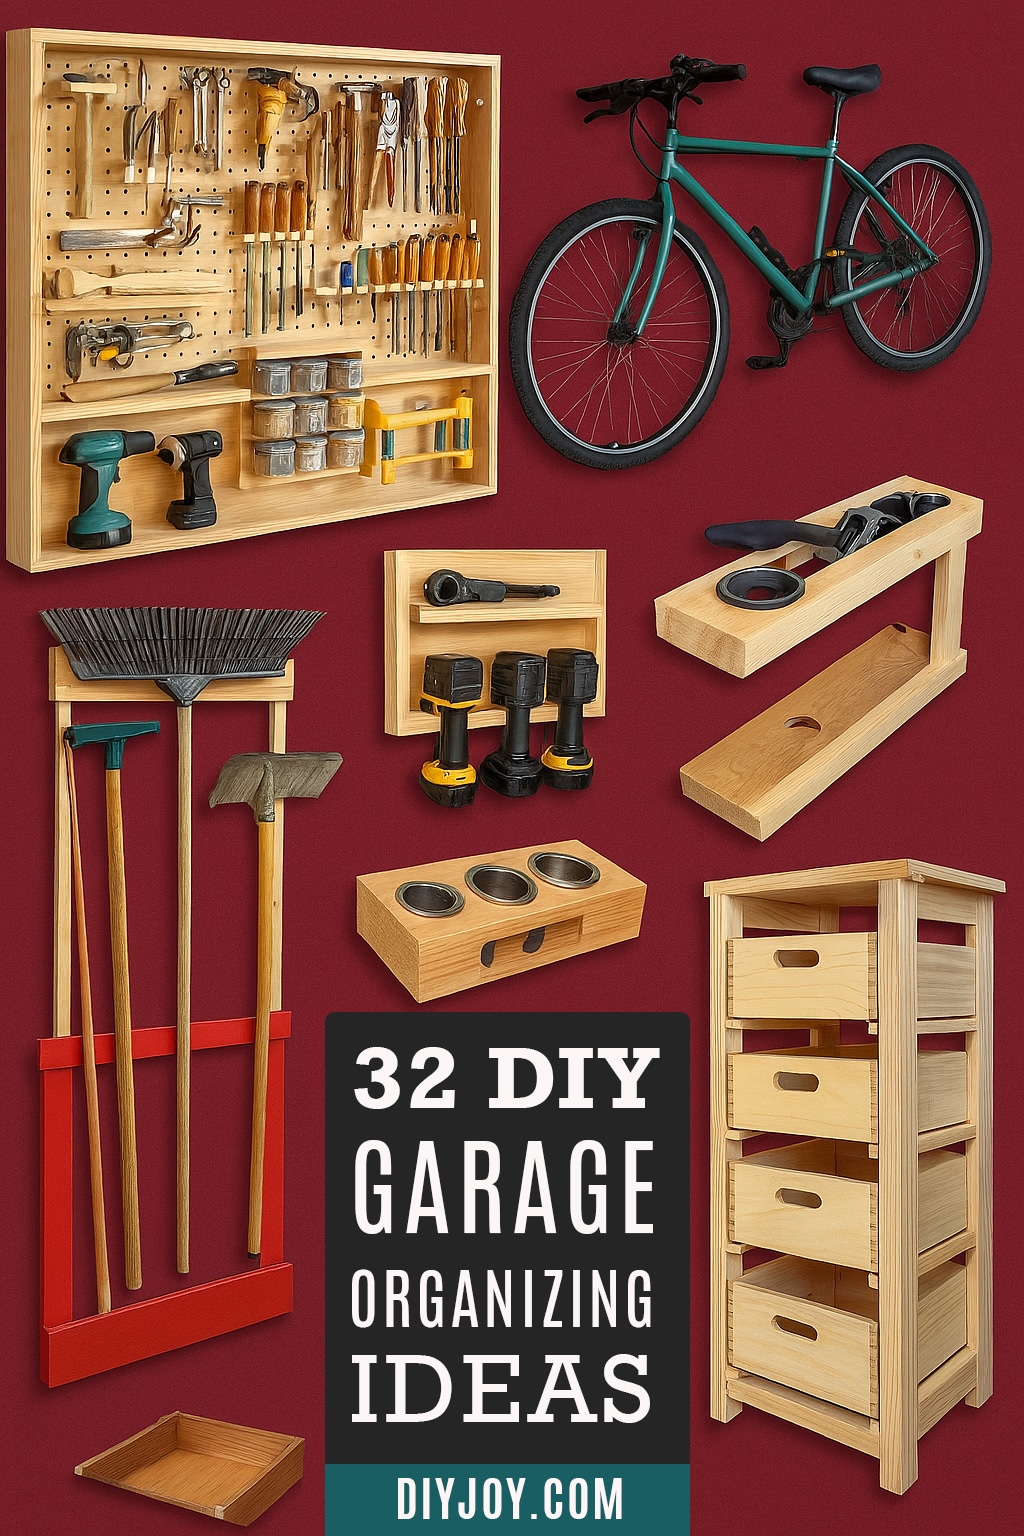
I have not done much woodworking myself, which turns out to be handy when you are picking garage organization ideas, because most of the good ones need almost none. A pallet, a few lengths of PVC pipe, a bought hollow core door and a sheet of pegboard carry a surprising amount of this list. Then there are the real builds for when you want one: a tower of 2x4s that costs around fifty dollars, a pegboard wall only five and a half inches deep so your car door still opens all the way, a workbench that folds flat against the wall when you are done with it. So here are 12 DIY ideas to organize the garage, running from free to a full weekend, with the measurements and the free plans where the makers published them. Perfect for lawn tools you keep tripping over, cleaning supplies living in four different corners, cordless drills on the floor and a car with one more door ding than it deserves.

Table of Contents
- DIY Garage Organization Ideas
- 1. Lawn Tool Storage Using A Pallet
- Small Garage Hacks
- 2. DIY Garage Storage Cabinets
- 3. Pool Noodle Car Door Protector
- 4. DIY Garage Storage Towers
- 5. Cordless Drill Storage Charging Station DIY
- Wall Storage Solutions
- 6. Garage Pegboard Tutorial
- 7. DIY Folding Bench Work Table
- 8. DIY Cleaning Storage Tower
- Overhead Storage Racks
- 9. DIY Crate Cabinet With Sliding Drawers
- 10. PVC Garden Tool Organizer
- 11. Epoxy Floor Coating For Your Garage
- Sports Equipment Storage
- 12. DIY Garage Pegboard Storage System
DIY Garage Organization Ideas
1. Lawn Tool Storage Using A Pallet
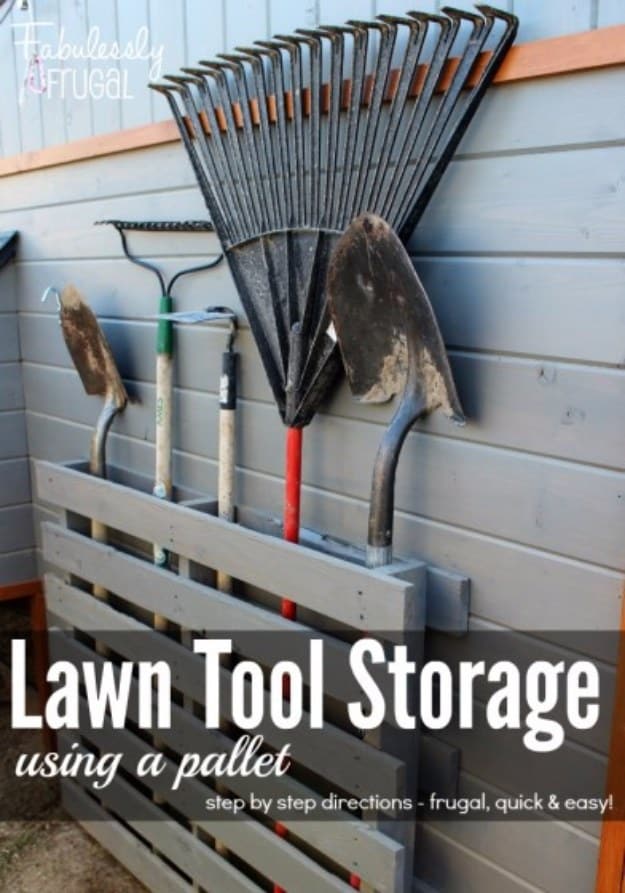
The cheapest fix on this list and the one most likely to get done today. A single pallet, pried apart just enough to leave slots, gets screwed to the side of a shed or the garage wall, and every long handled tool drops in nose down instead of falling across the floor. Supplies are a pallet, a hammer, a pry bar, heavy duty screws or framing nails, plus stain and a weatherproofing sealer if it lives outside. It took one day. Pallets are free if you ask a business first, or watch the local classifieds.
Get the full tutorial at Fabulessly Frugal.

Small Garage Hacks
Maximize limited garage space with clever hacks designed specifically for compact areas. Utilize the often-overlooked space behind doors with slim rolling carts or door-mounted organizers for cleaning supplies or small tools. Install fold-down workbenches that can be tucked away when not in use, and consider ceiling-mounted pulley systems for kayaks, canoes, or other bulky items that would otherwise consume valuable floor space. Magnetic strips attached to walls or inside cabinet doors create vertical storage for metal tools without requiring additional square footage. In small garages, consistent decluttering becomes essential – implement a seasonal purge schedule and a strict “one in, one out” policy to prevent accumulation of rarely used items.
2. DIY Garage Storage Cabinets
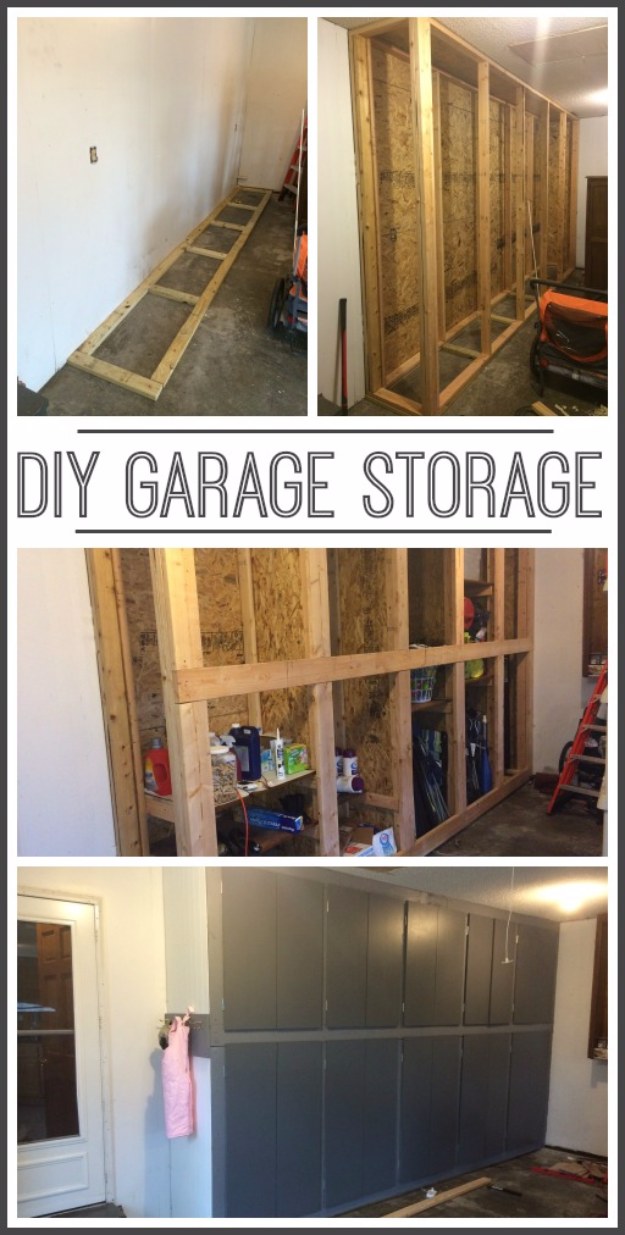
Full height locker bays built into a garage wall, with doors, and the construction sequence is the useful part. Frame the floor and line the area with plywood first, then frame in each locker individually so the heights can be set to whatever goes in them, a stroller, outdoor play gear, a gun safe. Every seam and gap gets caulked and sealed, which keeps moisture and pests out and stops anything transferring from one bay to the next. Frame and doors get painted at the end, which is what turns a stud wall into something that looks built in.
Get the full tutorial at Sugar Bee Crafts.
3. Pool Noodle Car Door Protector
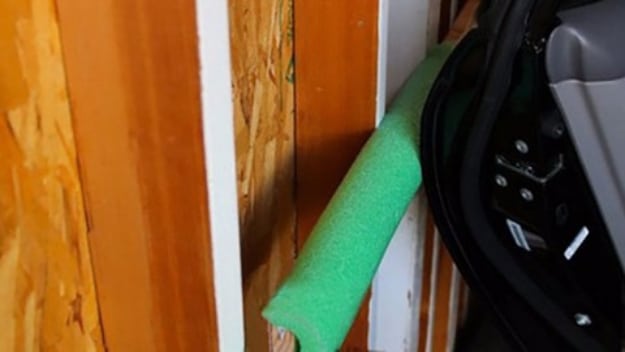
A pool noodle, split down one side and screwed to the garage wall at door height, and that sickening clunk when a car door swings into concrete stops happening. The whole job takes a couple of screws, a box cutter and the noodle, which is a few dollars, and it is finished in minutes. It is worth doing before the new car goes in rather than after, since a wall that has already dinged one set of doors will happily do it again. Set the height by opening the door first and marking where it actually lands.
Get the full tutorial at DIY Joy.
4. DIY Garage Storage Towers
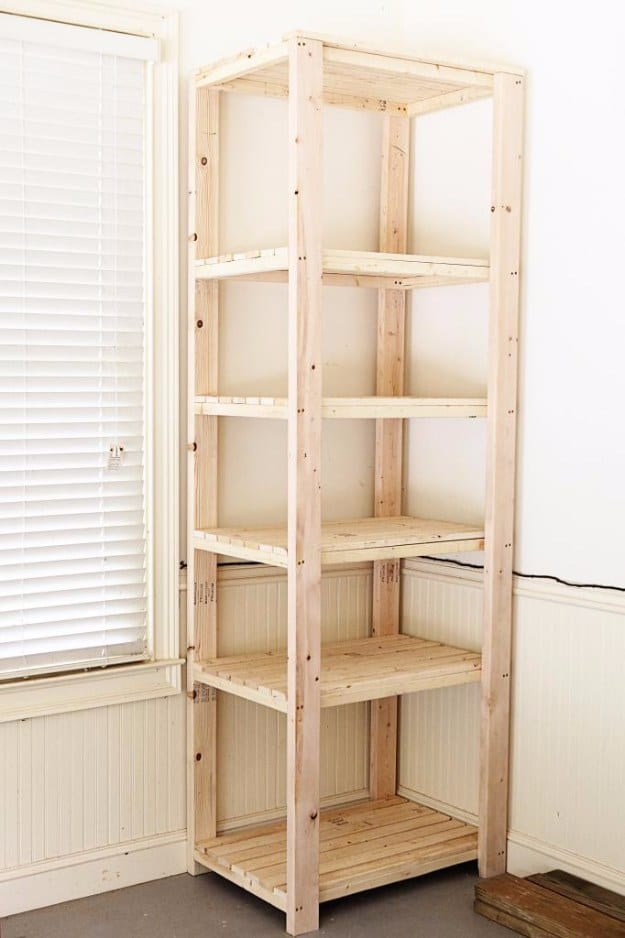
Eight foot tall shelf towers built from 2x4s, sturdier and considerably taller than the plastic units a store will sell you, at roughly fifty dollars each. Four 2×4 posts make the legs; the shelves attach with a 2×2 set in from the edge of each 2×4, so each side goes together looking like a ladder. Lean one ladder up, slot the shorter side pieces in between to line everything up, then predrill and screw the two together. Shelf spacing is set so plastic storage bins fit, which is what makes seasonal gear easy to slide up high and forget.
Get the full tutorial at Bower Power.
5. Cordless Drill Storage Charging Station DIY
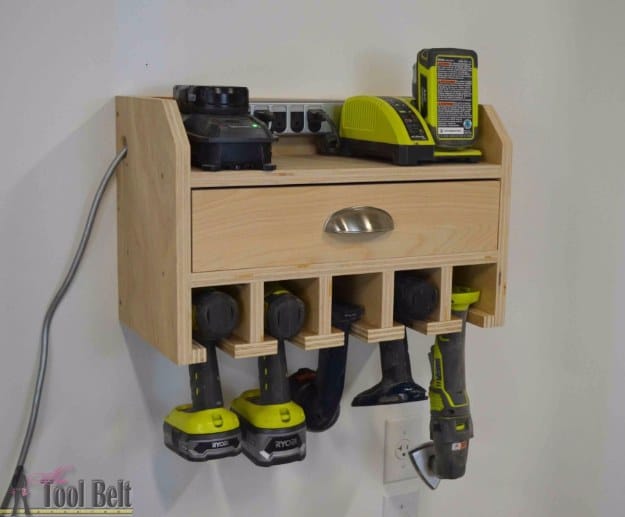
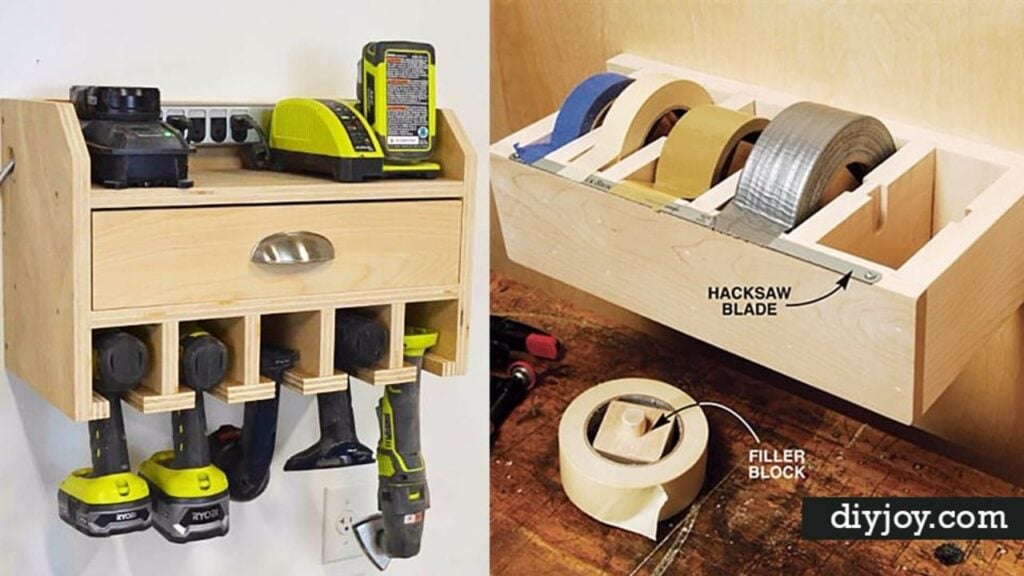
Five drills hanging in their slots, batteries and chargers on the shelf above, drill bits in a drawer underneath, all on the wall instead of in a heap. The free plan uses half a four by four sheet of three quarter inch plywood plus a little quarter inch ply, glue, screws and a drawer pull, and you can get three of these out of a full four by eight sheet. Dividers sit three inches apart and shelves four inches apart. If the top of your drill handle is wider than an inch and a half, widen the two and a quarter inch bottoms to match.
Get the full tutorial at Her Tool Belt.
Wall Storage Solutions
Maximize your garage’s vertical space with strategic wall storage systems. Wall-mounted pegboards, slat walls, and grid panels offer customizable solutions for hanging tools, sports equipment, and gardening supplies without sacrificing valuable floor space. Install heavy-duty hooks and brackets to accommodate bulkier items like ladders, bicycles, and lawn equipment. These affordable DIY wall storage solutions not only keep essentials within easy reach but also protect them from floor moisture and damage. Creating designated zones on your walls for different categories of items simplifies your organizational system and makes finding what you need effortless.
6. Garage Pegboard Tutorial
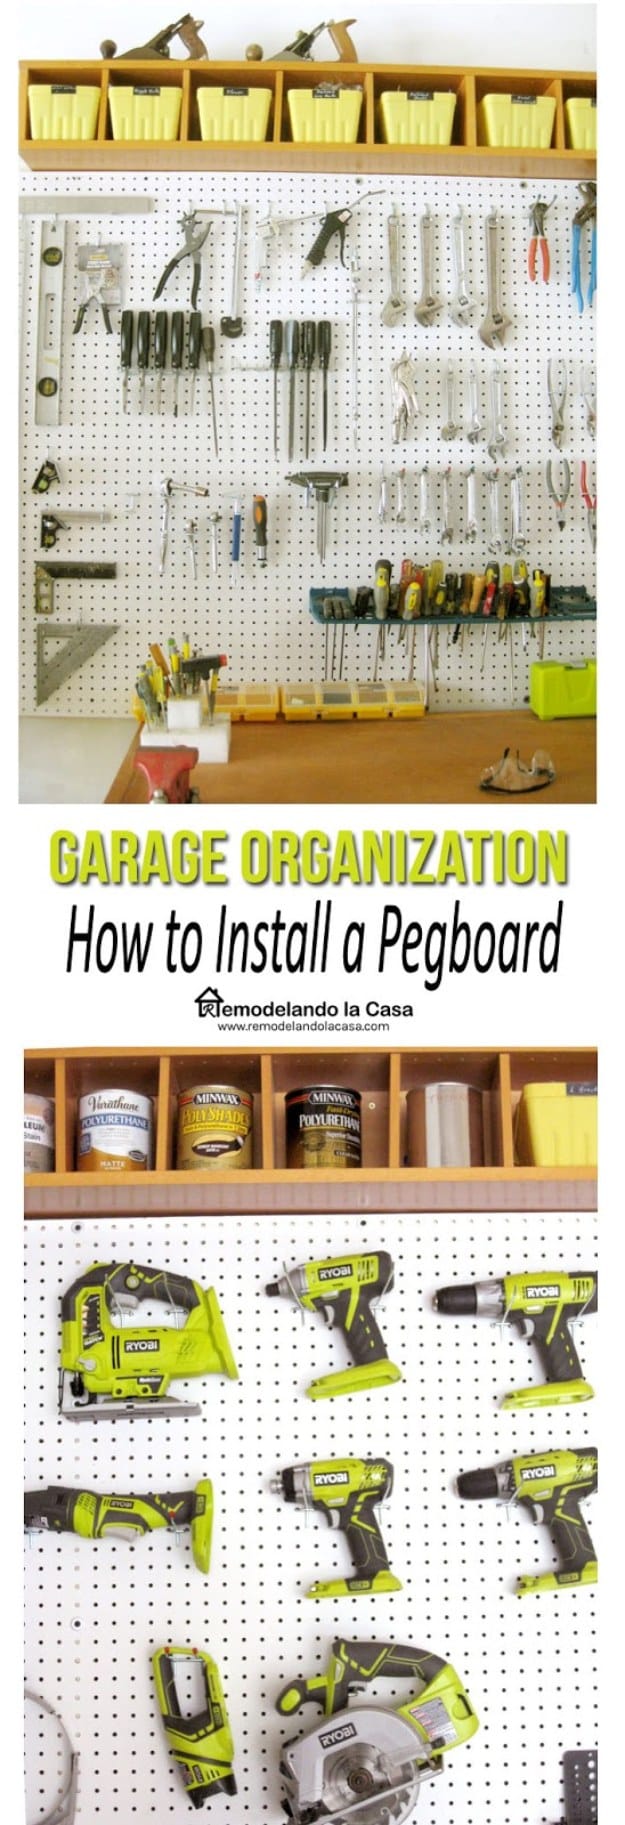
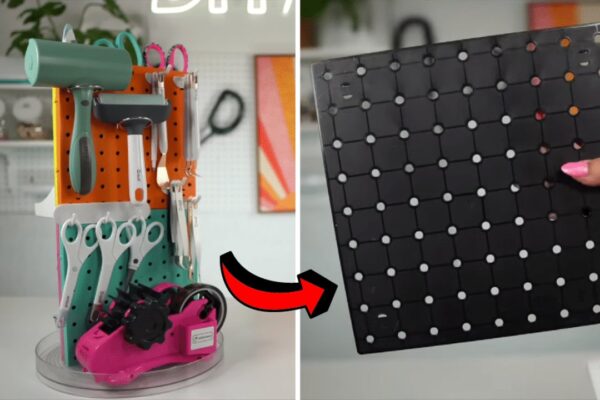
A full four by eight sheet of pegboard, framed and mounted properly, which is the difference between a tool wall that holds and one that bows. The frame is 2x2s, twenty seven and a half feet of them, joined with a pocket hole jig and screwed into the wall studs with three and a half inch screws, then the pegboard goes on with one inch screws and quarter inch washers. Find the studs and mark them first. The honest part of this tutorial is the admission that holding a full sheet up with one hand while driving the first screws is not a one person job.
Get the full tutorial at Remodelando la Casa.
7. DIY Folding Bench Work Table
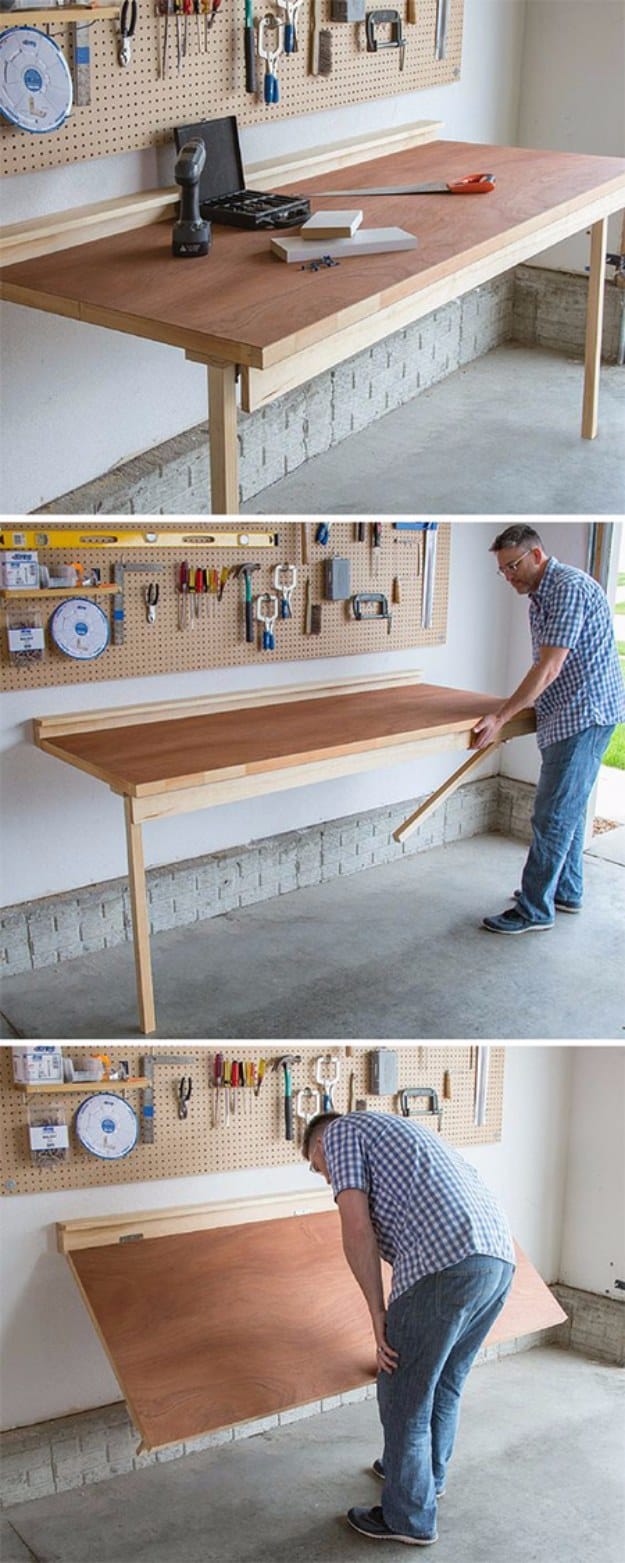
The worktop is a bought hollow core door, used exactly as it comes, which skips the hardest part of building a bench. A pine mounting cleat and shelf get cut to the same length as the door, so measure yours rather than trusting the standard height. Butt hinges along the back edge let it drop flat against the wall, two folding leg brackets carry a pair of pine legs, and a front rail underneath stiffens the top. Fischer wall plugs and ninety millimeter screws hold the cleat. Cut the legs to whatever working height suits you.
Get the full tutorial at Home-Dzine.
8. DIY Cleaning Storage Tower
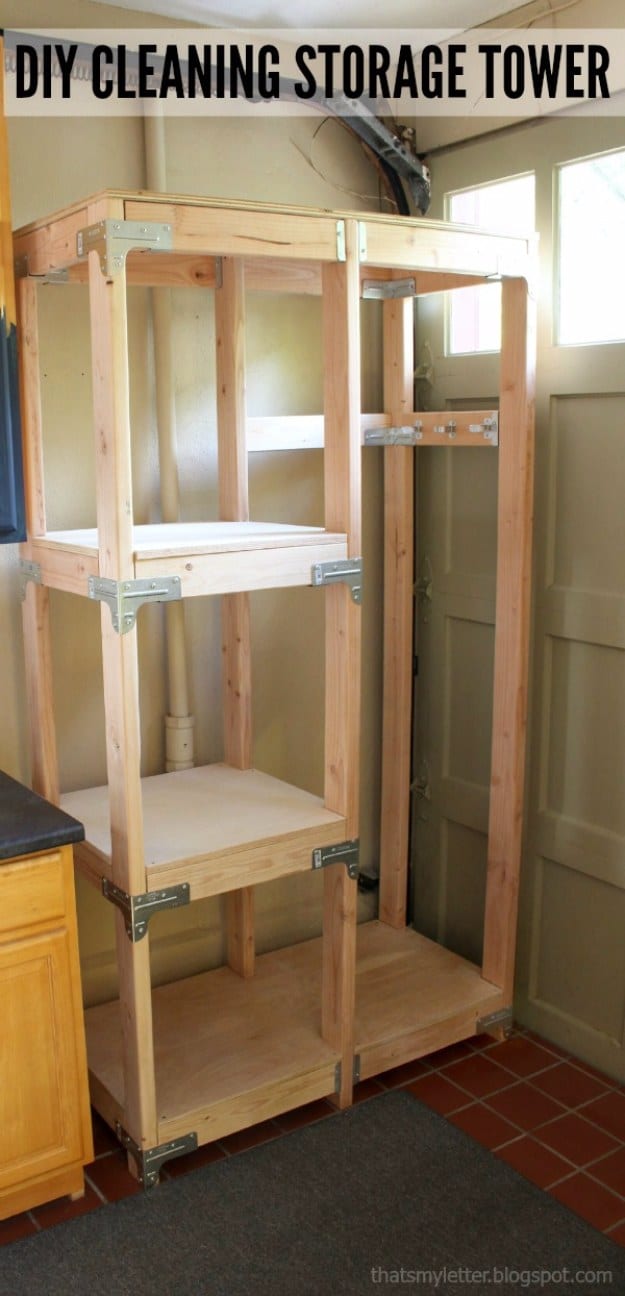
Brooms, mops, the vacuum, buckets and every bottle of cleaner in one tall unit instead of four different corners. The free plans are published in full, down to a PDF: eight 2x4x10 studs and a sheet of three quarter inch plywood, held square with seventeen Rigid Tie connectors and ten FB24Z brackets. The cut list has six legs at eighty three and a quarter inches, thirteen front and back supports at twenty and a quarter, nine side supports at fourteen, and four plywood shelves. The exposed metal connectors are a deliberate look as much as they are structure.
Get the full tutorial at Jaime Costiglio.
Overhead Storage Racks
Reclaim unused ceiling space with overhead storage racks, perfect for seasonal items and bulky belongings that aren’t accessed daily. These sturdy platforms suspend from your garage ceiling, creating additional storage square footage without impacting your parking or workspace below. DIY installation requires basic tools and hardware, though careful attention to weight limits and secure mounting is essential for safety. Opt for adjustable systems that can be raised or lowered as needed, and use clear plastic bins with labels to easily identify contents from below. Ideal for holiday decorations, camping gear, and off-season items, overhead racks dramatically increase your garage’s storage capacity.
9. DIY Crate Cabinet With Sliding Drawers
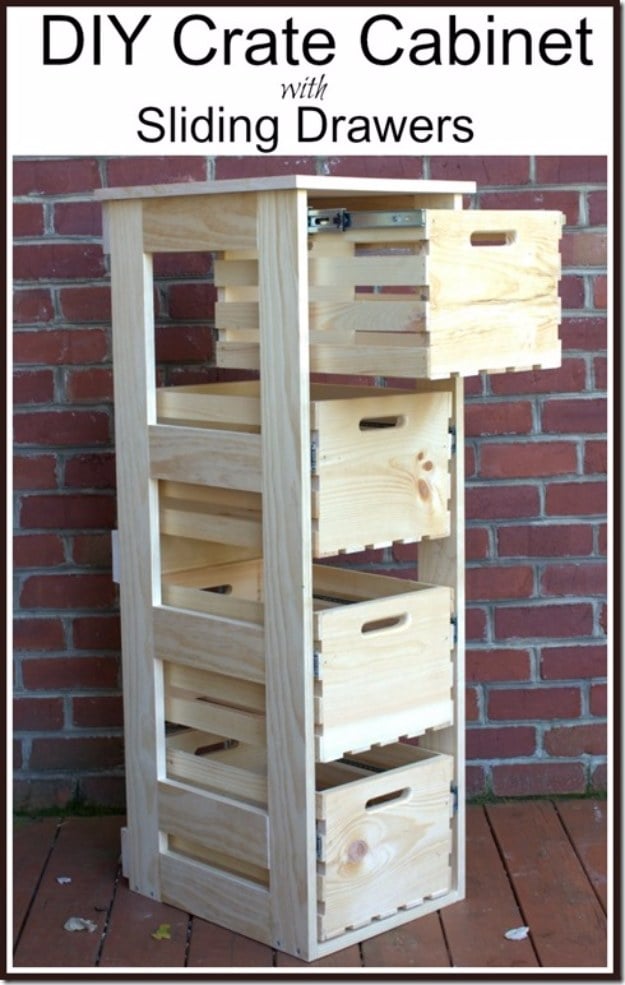
Four wooden crates from a home center, hung on real drawer slides inside a poplar frame, so each one pulls all the way out like a proper drawer. The frame is four vertical sides cut four feet long, twelve eleven inch supports for the sides and bottom, three fifteen inch supports across the back, and an oak veneer top edged with veneer tape. The detail that makes it work: eight strips of wood glued and nailed inside the crates first, to give the sixteen inch slides something solid to screw into. Adjust the height or drawer count to suit the wall.
Get the full tutorial at Sweet Pea.
10. PVC Garden Tool Organizer
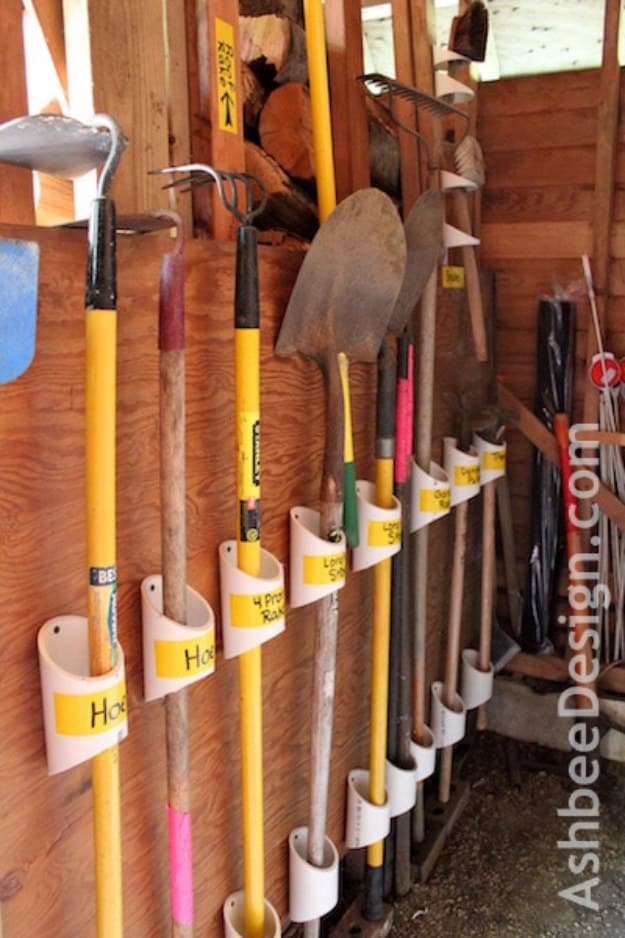
Short lengths of leftover PVC pipe screwed to the wall, each one holding a rake, shovel or hoe upright by the handle. The version that inspired it suggested twelve inch pieces; these were cut down to six inch lengths at roughly a thirty degree angle on a band saw, which lets the handle drop in at a natural lean instead of standing dead straight. They were mounted in two rows, one at mid height and one near the floor, so nothing tips out. The offcuts got kept and used too. Label each slot and tools actually go back.
Get the full tutorial at Ashbee Design.
11. Epoxy Floor Coating For Your Garage
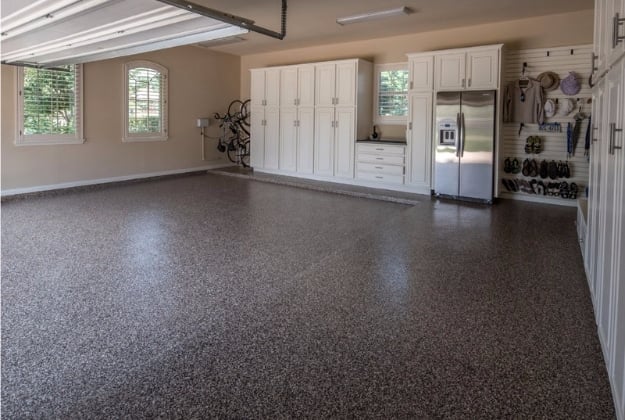
Worth understanding before you buy a kit: a garage floor coating is a resin that chemically cures into a hard, chemically resistant surface, not a paint that dries. Epoxy, polyurethane, polyurea and polyaspartic are the common ones. Two part products mix a resin and pigment with a hardener that sets the reaction going; single part products cure on moisture and oxygen in the air. What you get for the work is a sealed floor that shrugs off oil, brake fluid, road salt and deicing chemicals, and mops clean instead of staining.
Get the full tutorial at All Garage Floors.
Sports Equipment Storage
Tame the chaos of sports equipment with dedicated storage solutions that keep gear accessible but controlled. Wall-mounted racks with adjustable hooks accommodate balls, bats, rackets, and helmets, while floor-standing bins with wheels allow easy access to frequently used items. Create custom solutions like PVC pipe organizers for baseball bats or fishing rods, mesh hanging bags for balls, and vertical storage racks for bikes that maximize floor space. Consider seasonal rotation systems that bring current sports gear to prime accessibility while storing off-season equipment in less convenient overhead spaces. Proper sports equipment organization not only preserves your gear’s lifespan but also encourages family members to maintain the system.
12. DIY Garage Pegboard Storage System
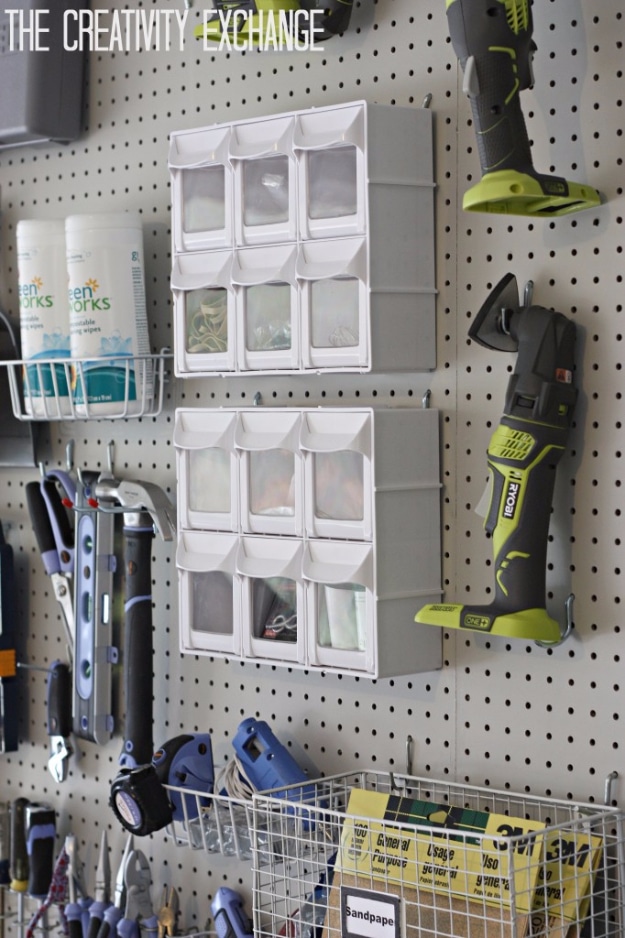
The measurement that makes this one worth copying is five and a half inches. That is the entire depth of the wall, frame, shelves and all, which was set by how much room there was between the wall and a car door opened all the way. At eight feet by eleven feet two inches it still swallows up to ninety six cans of spray paint on the middle shelf, two deep, and up to thirty four gallon cans of paint standing on the floor beneath it. The frame sides and shelves were built flat on the floor and then attached around the mounted pegboard.
Get the full tutorial at The Creativity Exchange.